• Skip to primary navigation
  • Skip to main content
  • Skip to primary sidebar

At Home With MrsC

Raising a family, making a home.

  • Home
  • About Me
  • Contact
  • Guest Post

Recipes

Recipe: Whole Wheat Spaghetti with Creamy Chicken and Broccoli

February 24, 2018 by MrsC | Patricia Cuyugan Leave a Comment

Every once in a while, I get lucky in the kitchen and make something good out of things I just throw into a pot. Yesterday was one of those times.

We had a power outage early yesterday evening. It only lasted a little over an hour, but I was left with barely any time to make dinner. I have this thing about not opening the fridge when the power is out (thanks to my mom and the frequent Manila blackouts of the 90’s,) so I really didn’t move until the electricity came back on. Then the mad dash to make dinner began. It’s a good thing I stocked up on some of my essential pantry staples over the week, and was equipped to make something on the fly. 

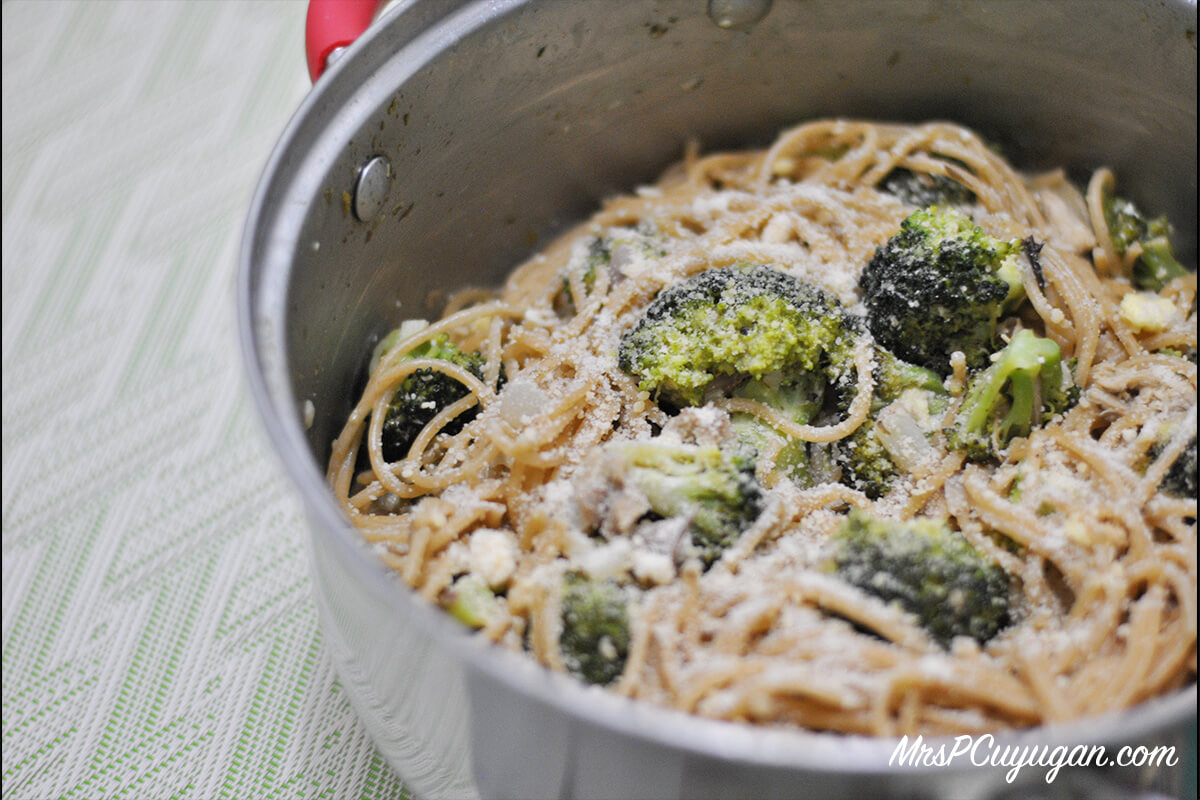
And so my Whole Wheat Spaghetti with Creamy Chicken and Broccoli was born. This is one of those dishes that’s so simple and easy to make, it doesn’t actually need a recipe. But in case you want to try making it yourself (and also so I remember how to do it next time haha,) I’m writing it down here.

Before anything else, a quick tip when making simple recipes with few ingredients. Quality matters. Because your dish doesn’t contain much, most if not all flavors can and will stand out. So if you put something in there that’s not that good, you’ll taste it. Trust me on this. Okay, moving on.

Quick. Easy. Healthy. Delicious. My idea of an awesome dinner.

This recipe starts with 250g of whole wheat spaghetti. I bought mine from Earth Origins, my go-to place for organic, healthier eats. We’re all out of gluten-free pasta at home, and I think that this might be the next best thing. It doesn’t look like our skin is reacting badly to it. Maybe our problem isn’t exactly with gluten, but more specifically with bad, over-processed, commercial gluten. That’s something worth exploring.

Boil the pasta as you normally would. Make sure to salt your water. I didn’t start doing that until my brilliant Pinay-American-Italian friend, MommaNManila Mish, told me to. It has made my pasta so much better. Cook until al dente. I always pull out a noodle and take a bite just to be sure it’s cooked just right. That rhymes. I don’t put oil in my water or on the noodles after they’re done, but some people do. You could, too. That also rhymes.

Set aside the noodles, and set aside some pasta water because you will need it later. 

In the same pot (yay for less-mess cooking!) heat some good olive oil. I used Molinera EVOO for this. I recently switched to this from another brand that got voted “Not good” by my trusted circle of cooking mommy friends. It’s worth it. Once the oil is hot, sautĂ© onions then garlic in that order. Onions first so the garlic doesn’t burn. 

Next, add one cup of your favorite chicken that’s been shredded. I used leftover Baliwag lechon manok for this. You can use homemade roasted chicken, your favorite rotisserie chicken, whatever. When I buy from Baliwag, I usually take the chicken home whole. That way I can slice it up myself and keep the bones of the body intact for when I make stock. When we’re all done eating, I shred whatever meat is left, put it in a jar, and stick in the freezer for future use. This recipe is what I mean by future use.

Once the chicken is nicely warmed up, add cut up broccoli florets. I have no idea how much broccoli I used here, to be honest. You can just use as much as you want to use. I’m not kidding. I told you this recipe was simple. My broccoli is also from Earth Origins. I like buying this particular veggie organic because it’s hard to clean, and I always worry that there’s still pesticide and chemical residue in there somewhere that I missed. So yes, for broccoli, go organic.

After tossing the broccoli and chicken together for a bit, add liquid to the pot. I used 1/2 cup of homemade veggie stock plus about 1/4 cup of pasta water. The pasta water helps thicken the sauce. I make the veggie stock myself using vegetable scraps. It’s unsalted. I salt as needed when I cook. Don’t forget that the pasta water is salted. Taste as you go along. You can use plain water if you don’t have stock. You can even use all pasta water. It’s really up to you.

Bring the pot to a boil, lower the heat, then add cream. I used about half a small brick of all-purpose cream. I also added 1/4 cup of yogurt because I find that it cuts through the richness of the cream, and gives the sauce a tiny hint of tartness, which I really like. I used homemade yogurt but you can use any PLAIN yogurt. Emphasis on plain. Unsweetened. You can also add some lemon juice instead of yogurt. This works, too. Just enough so the cream isn’t nakakaumay. What is nakakaumay in English?

Next, add a teaspoon or two of pesto into the pot. I used bottled pesto for this because I don’t really make everything from scratch haha. This adds a nice herby, green taste to the creamy sauce. Stir a little, then add a some Parmesan cheese into the sauce. Just eyeball it. Add as much as you want. This helps make the sauce thicker, and also saltier. I don’t add any more salt to this dish. The cheese and pasta water are enough for me.

Simmer for a few minutes. Season with pepper and your favorite herbs. Once the sauce tastes right, and is as thick as you want it to be (I wait until it coats a spoon nicely,) add the noodles back into the pot. Mix, mix, turn off the heat, add more cheese on top, and you’re done. The whole process took me 30 minutes, including ingredient prep. How easy is that?

Don’t you just love quick and easy dinner recipes? Let me know if you try making this, okay?

Whole Wheat Spaghetti with Creamy Chicken and Broccoli
2018-02-23 20:29:02
Serves 4
A quick and easy dinner recipe made with pantry staples and leftovers.
Write a review
Save Recipe
Print
Total Time
30 min
Total Time
30 min
Ingredients
  1. 250g Whole Wheat Spaghetti
  2. Half a head of garlic, minced
  3. 1 Small red onion, finely chopped
  4. 1 cup Shredded leftover roasted chicken
  5. 1-2 cups Cut up broccoli florets
  6. 1/2 cup Vegetable stock
  7. 1/4 cup Pasta water (from cooking the noodles)
  8. 1/4 cup All-purpose cream
  9. 1/4 cup Plain yogurt
  10. 1-2 teaspoons Prepared pesto sauce
  11. Parmesan cheese
  12. Black pepper
  13. Fresh or dried herbs for seasoning (Oregano, thyme, basil)
Instructions
  1. In a medium-sized pot, cook pasta according to package directions. Drain and set aside. Save pasta water.
  2. In the same pot, heat olive oil. Then, saute onions and garlic.
  3. Add shredded chicken and toss until warmed and slightly browned. Add broccoli, and toss for a few seconds.
  4. Pour in veggie stock and pasta water. Bring to a boil. Lower the heat, then add cream and yogurt. Stir and allow to simmer for a few minutes.
  5. Add pesto, then Parmesan cheese into the sauce. Mix well. Simmer a little more. Season with pepper and herbs.
  6. Add spaghetti back into the pot. Mix into the sauce. Top with more cheese. Remove from heat.
  7. Serve with a smile and a side salad. Garlic bread, too, if you wish. Enjoy!
By MrsC
At Home With MrsC https://blissbysam.com/

Filed Under: Recipes Tagged With: 30 minute meals, Cooking at home, Dinner, Pasta, Recipe

Recipe: Tuscan Chicken Burgers [Gluten-Free!]

September 30, 2016 by MrsC | Patricia Cuyugan 17 Comments

One day, I was sitting on my sofa, and I noticed just how many cookbooks I’ve accumulated over the years. Confession: I hardly ever use them for cooking. I browse through them every once in a while, but I usually search the internet when I need a recipe because that’s just easier to do.

Thing is, I went through something recently that helped convince me that less is really more. So I am slowly but surely, and as aggressively as I can be (given that I’m really a hoarder at heart,) purging. Yes, it’s true. And yes, I will really see this purge through until the end. (Really, MrC, really. I know you are super skeptical about this.)


New cookbooks, yay!!! Thank you, @tuttlepublishing, for making my day! #tuttlepublishing #cookbooks

A photo posted by MrsC | Patricia Cuyugan (@mrspcuyugan) on Aug 21, 2016 at 12:25am PDT

So now my attention is focused on my cookbooks. Honestly, I don’t know which ones I should keep, and which can go. I don’t think that I’ll be able to decide until I actually try a few recipes from each of them, though, because that’s the only way that I can pick objectively. Right? It’s a slow process, but I really feel like I need to do it. 

And so, from now on I’ll be featuring a cookbook of the month right here on the blog. Along with the review, I plan on including a recipe from the book; One that I made at home and absolutely loved. If I don’t end up liking what I tried from the book, then obviously there’s no room for it in my blog or on my book shelf. Period.

This month’s cookbook is  Paleo Italian Cooking by Cindy Barbieri, which was given to me by the lovely people over at Tuttle Publishing. I was excited about this cookbook from day one because I’ve been worried that going gluten-free would mean saying goodbye to Italian food. This cookbook brought hope to my kitchen and my tummy. And I’m super happy to share that it did not disappoint.

mrspcuyugan
Gluten-free Italian recipes? Yes, please!


I’ve read the entire book from cover to cover. Yes, all the forewords, introductions, ingredients, procedures, tips, footnotes, and photo captions. I love that the author shares little bits and pieces about her life all over the book, and how each recipe represents a memory, a loved one, the author’s home, and her personality. I kinda feel like I know her already.

The book is divided into helpful chapters, making it super easy to find the recipes that you want. There are chapters for sauces and condiments, brunch (which is awesome!), meat, seafood, pasta, and a lot more. Yes guys, there are pasta recipes in this paleo/gluten-free cookbook. Told you we have a winner here.

One of my favorite sections is the one about keeping your Italian kitchen paleo. It’s taken a lot of research, and a whole lot of stopping to read at grocery aisles for me to transform my pantry into a functioning gluten-free one. So the fact that this cookbook explains the basics of the paleo lifestyle, and what you need to have in order to cook for that diet, is a huge help to me.

mrspcuyugan
Tip: Always, always, always read a recipe from start to finish before you start cooking. Trust me.


And now, the most important part, the recipes. The ingredients and procedures in each recipe are clearly stated and easy to understand. The author shares personal tips in there, too, which for me is always a good thing. Plus, the photos look amazing, which of course is important when you’re talking about food. Everything is fresh, healthy, colorful, and super exciting.

I recently tried the recipe for Tuscan Turkey Burgers written in this book, only, I used chicken instead of turkey because ground turkey is hard to come by here. This dish was so good that MrC had it for dinner, then lunch the next day, and then lunch again the day after that. Mm-hmm. Husbandry-approved! The kiddo wasn’t too fond of it, though, most likely because of the spinach. But he ate it all up anyway. Thank goodness he isn’t a picky eater.

mrspcuyugan
Ta-da! Tuscan Chicken Burgers. Only three left on the plate coz we ate the other three already.


So, yes, Paleo Italian Cooking stays. I can’t wait to try the other recipes listed in this cookbook. And I’m also excited to start experimenting with the other cookbooks in my collection. Stay tuned, guys! 


Tuscan Chicken Burgers [Gluten-Free!]
2016-10-05 01:50:11
Serves 6
Write a review
Save Recipe
Print
Prep Time
15 min
Cook Time
15 min
Prep Time
15 min
Cook Time
15 min
Ingredients
  1. 500g Ground chicken
  2. 1 Egg
  3. 1 tsp Sea salt, divided
  4. 1 tsp Ground black pepper, divided
  5. 1 tbsp Olive oil
  6. 1/4 cup Red bell pepper, diced
  7. 1/4 cup Yellow onion, diced
  8. 5 cloves Garlic, minced
  9. 1 cup Fresh baby spinach, chopped
  10. 6 leaves Basil, chopped
  11. 1 tsp Fresh thyme
  12. 1/4 tsp Dried red pepper flakes
Instructions
  1. Place ground chicken in a large bowl. Make a well in the center and break the egg into it. Blend well with a spoon. Season with 1/2 teaspoon each of salt and pepper. Set aside.
  2. Place a skillet over medium heat. Add the olive oil. Once hot, add the red bell pepper and onion. Season with remaining salt and pepper.
  3. Saute, stirring frequently, for 2 minutes. Add the garlic, spinach, basil, thyme and red pepper flakes. Cook for 1 minute more, then remove from heat.
  4. Once the vegetables are cool, add them to the bowl of chicken.
  5. Use your hands to mix all ingredients well. Form the mixture into 6 burgers.
  6. Cook on a grill or pan over medium heat, about 6 minutes per side, flipping once, until cooked through.
Notes
  1. The fresh herbs really make a difference in this recipe, so if you have them use them. Otherwise, 1/2 teaspoon each of dried basil and thyme would work, too.
  2. The chicken mixture can be a bit sticky, so use wet hands when forming into patties.
  3. The original recipe says to divide the chicken mixture into 4 burgers, but I found them to be too big, which is why I split them into 6 instead.
  4. I served this with a super easy honey-mustard dipping sauce, which is just 1 part yellow mustard mixed with 1.5 parts good raw honey. Enjoy!
Adapted from Paleo Italian Cooking
At Home With MrsC https://blissbysam.com/


P.S. I’m writing this post in October, but setting the publish date to September 30 because I was supposed to write about this in September but my life has been insane. Just thought I’d come clean about that. Lol! đꙂ

Filed Under: Food & Recipes, Recipes Tagged With: Cookbook Review, Gluten Free, Italian Food, Paleo, Recipe

Recipe: Brown Sugar Puto

September 22, 2016 by MrsC | Patricia Cuyugan 1 Comment

Oh, what a month September has been for me! After a near-empty August calendar, this month has been overflowing with writing tasks, events, meetings, and errands, and we’re not done yet! It’s been crazy, but I’m not complaining.


The star of today’s show, the McLaren Honda F1 car. #pims2016

A photo posted by MrsC | Patricia Cuyugan (@mrspcuyugan) on Sep 14, 2016 at 2:54am PDT


It’s months like this when my little book of easy-to-make, tried-and-tested, make-and-freeze recipes comes in handy. My little kitchen and I have been doing well so far. No one has gone hungry (yet!), despite the fact that I had to be at events for seven straight days last week. 


Last day tomorrow! ?? #pims2016

A photo posted by MrsC | Patricia Cuyugan (@mrspcuyugan) on Sep 17, 2016 at 5:20am PDT


Slow clap. Ok. Moving on.

My homemade puto has quickly become one of my go-to, weekly staples since our household turned (mostly) gluten-free. It’s super easy to make, takes no time at all, and only requires four ingredients, all of which I always, always have in my pantry – Water, brown sugar, rice flour, and baking powder.

Puto recipe
Rice flour has become a pantry staple in our house ever since we shifted to gluten-free eating. I also make sure to always have cornstarch, potato starch, tapioca starch and some kind of gluten-free flour blend on hand.


A quick note on baking powder in gluten-free cooking – Not all BPs are GF. Some brands may contain wheat starch. When in doubt, make your own. It’s super easy. Just sift together two parts cream of tartar + 1 part baking soda + 1 part cornstarch. Done.


Puto + cheese is my gluten-free alternative to pandesal + cheese. Guys, ang galing ko na gumawa ng puto. Lol. Will share the recipe #ontheblogsoon! #theglutenfreeproject

A photo posted by MrsC | Patricia Cuyugan (@mrspcuyugan) on Sep 10, 2016 at 11:58pm PDT


I found this recipe in a Good Housekeeping Fast & Easy cookbook that my mom bought several years ago. Of all the rice flour-based puto recipes I’ve tried, this one has been the best so far. The original calls for muscovado sugar, which I don’t usually have at home, but brown and even white sugar work well, too. I imagine it would be awesome with coco sugar as well. 

Puto recipe
The puto batter is gonna be super runny, so don’t panic. And don’t be tempted to add any more flour in there either.


One thing I’ve learned about puto-making is that size matters. I usually get better, fluffier puto when I make them small. I do have mini molds, but I prefer to just use silicone muffin cups for my puto. Then, I fill them up to 1/3 full only. Half-full is already too much. Yes, it makes a difference.

Puto recipe
Remember: Less is more! This puto cooks more evenly the smaller you make them.


You also want to make sure that no moisture drips from the lid of your steamer into your puto molds. If you’re using a bamboo steamer, then you’ve got no problem. But I use a regular pot with a regular glass lid, so I make sure to wrap that lid with a kitchen towel to absorb moisture. It works like a charm.

Puto recipe
My steamer looks like it’s wearing a turban. And yes, most of my kitchen things are colorful and cute.


I hope to eventually learn how to make gluten-free bread, but for now, this puto serves as our bread substitute at home on days when cravings hit. Though, truth be told, our need for bread has decreased a lot since we made the switch.

This whole gluten-free thing hasn’t been half as difficult as I thought it would be. And yes, the results are amazeballs. No more itchy rashes for the kid. No more swollen feet for me. We’ve all been sleeping better. We’re all less sluggish, and less moody, too.

Of course, I’m not 100% certain that all this is due to the absence of gluten in our lives. But hey, it seems to work, so right now I’m all for it.


Brown Sugar Puto
2016-09-21 18:02:23
Yields 12
A gluten-free, dairy-free, kid-approved, light and fluffy rice cake made with brown sugar.
Write a review
Save Recipe
Print
Ingredients
  1. 1 cup water
  2. 3/4 cup brown sugar
  3. 1 cup rice flour
  4. 2 tsp baking powder
  5. Butter, oil, or cooking spray for greasing puto molds
Instructions
  1. Prepare your steamer. Grease puto molds, and set aside.
  2. In a large bowl, dissolve the sugar into the water. Sift rice flour and baking powder into the water mixture, and mix until well-blended.
  3. Pour mixture into the prepared puto molds, and place into the steamer.
  4. Steam until a toothpick inserted into the center of the puto comes out clean, about 5-7 minutes for mini puto or 8-10 minutes for larger molds.
  5. Remove from steamer and allow to cool.
  6. Serve with butter, sugar and niyog toppings if desired.
Notes
  1. If using regular-sized silicone muffin cups as molds, only fill these to 1/3 full.
Adapted from Good Housekeeping Fast & Easy Cookbook
At Home With MrsC https://blissbysam.com/
Puto recipe
One final note: DO NOT be tempted to open the lid and take a peek at your puto before the minimum cooking time is done. If you do, you won’t get this nice crack on top.


I love eating these with slices of salty cheese on the side. How do you guys like your puto? 

Filed Under: Food & Recipes, Recipes Tagged With: gluten free puto, gluten free recipe, Puto recipe

Recipe: Knorr #LutongNanay Sinigang with Pakwan

July 15, 2016 by MrsC | Patricia Cuyugan 4 Comments

It’s me! I’m back. I know, I disappeared on you guys again. I’m sorry. It’s just, you know… Life. 

So, it’s been a month since my last post. Since then, we celebrated our first home-iversary. Yes, Casa Cuyugan turned a year old, and I never got to write about it! Basically, we celebrated with a nice big pot of sinigang. 

Why sinigang? Because it’s the first thing I ever made in my brand new kitchen, and we’ve decided to make celebratory sinigang a tradition. Since it was a special occasion, I made sure that my sinigang was special, too. I used leftover frozen Zubuchon instead of plain pork. Soooooo good.

So obviously I was feeling proud of myself for making more than just the usual sinigang, right? Well, lo and behold, days later, I learned a few more ways to jazz up this old favorite. This happened at the Knorr #LutongNanay event at The Cookery Place in BGC, which was hosted by celebrity mom, Camille Prats.

Knorr #LutongNanay sinigang
Class photo at the Knorr #LutongNanay event!


You guys have to understand, my pantry is stocked with Knorr products in real life. I grew up with food made from these recipe mixes, soups, broth cubes, and seasonings. I learned to cook using them, too. The sinigang mix in particular. This is the only way I know to make sinigang. 

I’m beyond excited to be part of the Knorr #LutongNanay campaign. Feel na feel ko sya. I’m a home cook, and I take pride in the dishes that I prepare for my family. Food really is my love language. Meal time is bonding time for us, too, so I really do my best to have hot, fresh favorites ready for the occasion.

Knorr #LutongNanay sinigang
It’s like a baby version of my pantry! Only, I have fewer pretty plates.


Knorr’s Senior Brand Manager, Czarina de Leon-Manalo, shared with us that the goal of the campaign is to bring back the value behind home cooked meals especially since people choose to eat outside or even alone in this fast-paced world.

She said, “Knorr aims to help more moms bring the family together through the best flavors in their cooking. Cooking is a force for good. When a mother cooks, it is often seen as a way for her to ensure her family’s well being – and through Knorr, moms can serve nutritious meals without sacrificing great flavor.”

I love it.

After the introductions and presentations, Chef Sari Jorge of 25 Mushrooms Kitchen started off with a demo of Knorr Sinigang with Pakwan . Truth – I wasn’t too sure about the idea of having watermelon in my sinigang. But guys, you have to try it. The pakwan adds a nice touch of sweetness to the broth. Extra rice levels.

Knorr #LutongNanay sinigang
Chef Sari Jorge teaching us how to make Knorr Sinigang with Pakwan, with the help of Camille Prats and Peachy.


Here’s the recipe.

Knorr Sinigang with Pakwan
2016-07-14 16:08:24
Write a review
Save Recipe
Print
Ingredients
  1. 500 grams
 Pork Belly, sliced 3 inches x 1 inch
  2. 3 tbsp Knorr Liquid Seasoning
  3. 2 tbsp 
vegetable oil
  4. 1 liter water
  5. 3 cloves garlic, crushed
  6. 1/2
 onion, cut into 2 wedges
  7. 3 tomatoes, sliced into quarters
  8. 1 inch fresh ginger, cut into fine matchsticks
  9. 1
 lemongrass stalk, white part only
  10. 2 pcs fresh kaffir leaves (optional)
  11. 200 grams gabi, sliced into cubes
  12. 500 grams seedless sweet watermelon, peeled and cut into 1inch cubes (divided into 2 parts)
  13. 1 22g pack Knorr Sinigang sa Gabi Mix
  14. 1 Knorr Beef Cube
  15. 1 tbsp
 fish sauce, plus extra to taste
  16. 1 tbsp soy sauce
  17. ¼ tsp 
freshly ground black pepper
  18. 2 long green chillies, sliced
  19. 150 grams
 sitaw, cut into 7 cm lengths
  20. 100 grams
 okra
  21. 1 bunch 
kangkong
  22. Steamed rice, to serve
  23. Fish sauce to serve
Instructions
  1. Marinate the pork belly in Knorr Liquid Seasoning for at least 30 mins.
  2. Place a large casserole over medium-high heat. Add the oil and, working in batches, cook the pork until evenly browned. Remove with a slotted spoon and set aside.
  3. Reduce the heat to medium. Add the garlic and onions to the casserole. Add the tomatoes, ginger, lemongrass, gabi and watermelon and cook for 2 minutes before returning the pork to the casserole.
  4. Add the water, Knorr Sinigang sa Gabi Mix, Knorr Beef Cube. Cook for a further 1–1½ hours until the pork is tender.
  5. When the pork is tender, remove the pork from the casserole and set aside. Strain the liquid and add the fish sauce, soy sauce and pepper to taste.
  6. Add the remaining watermelon, beans, chilies, and okra and cook for 20 minutes, before adding the water spinach and cooking for a minute until all the vegetables are tender.
  7. Serve with steamed white rice and fish sauce for dipping.
By Knorr Philippines
At Home With MrsC https://blissbysam.com/
Knorr #LutongNanay sinigang
It’s our turn to cook!


After the demo, we were split into four groups, and each one had to prepare an out of the ordinary sinigang recipe. Ours was Knorr Sinigang na Grilled Liempo . This was super similar to my lechon sinigang, with a smoky-tart-salty broth. I love that it’s a creative way to use up leftover grilled meat, too.


More sinigang, more fun! Another yummy dish from this afternoon was this Grilled Liempo Sinigang, lovingly whipped up by @mymomfriday, @yendreyfus and moi. Smokey, salty, sour, perrrrfect. Plus, this is a great way to recycle leftovers, too! O, diba? #knorrph #lutongnanay #asimkiligpamore

A photo posted by MrsC | Patricia Cuyugan (@mrspcuyugan) on Jul 4, 2016 at 5:05am PDT


The one I am super excited to make at home is this Knorr Sizzling Sinigang . Isn’t it so interesting? I heard that there’s a restaurant that serves this, but I’ve yet to try it. 

Knorr #LutongNanay Sinigang
I never thought you could serve sinigang on a sizzling plate, but diba, this looks so good?


Another team made a Knorr Surf and Turf Sinigang, and the last group prepared their version of the Knorr watermelon sinigang recipe.

Knorr #LutongNanay sinigang
Knorr Surf and Turf Sinigang. Classy!


It was such a fun afternoon, and I’m extra happy because I now have four new dishes that I can make for dinner at home. I wonder which of these Knorr sinigang versions the boys will like best? Keep you posted!

Knorr #LutongNanay sinigang
Knorr Sinigang with Watermelon. It’s actually good!


Do you do sinigang differently? Tell me about it in the comments!

*All photos courtesy of Knorr Philippines

Filed Under: Food & Recipes, Recipes Tagged With: Knorr Lutong Nanay, Recipe, Sinigang

Recipe: Chicken Tinola

May 28, 2016 by MrsC | Patricia Cuyugan Leave a Comment

I haven’t been sharing as many recipes as I would like, and to be honest it’s because I’m usually too lazy to take photos of my cooking process. There, I said it. Lol.

Yesterday, though, for some reason, I decided to post a sorta step-by-step cooking demo on Snapchat. Yep, this app has me completely hooked. I love how it helps me deal with my camera shyness (which doesn’t necessarily mean that I’m any less awkward on-camera.)


Decided to document my dinner preps on #Snapchat. Mahirap pala to snap while cooking. But I had fun. If you wanna learn how to make tinola and/or afritada, go see my snaps! ? Para di naman sayang effort ko hahahahah.

A photo posted by MrsC | Patricia Cuyugan (@mrspcuyugan) on May 27, 2016 at 5:24am PDT

So, about yesterday’s Snapchat cooking session – I had one chicken and I made two dishes out of it. Chicken Tinola  was the first. This dish is great because it’s easy to make, it freezes well, it pairs well with other viands, and you can make it really healthy.

Truth: I’m not a fan of tinola. But my boys seem to like it (the husbandry actually loves it,) so I make it anyway. 

For my tinola, I used the breast, back and neck portions of the chicken. I opted to keep the skin on because it really just makes the dish a million and one times more delicious, but if you are more health-conscious than I am, then I recommend you go skinless. 

Start by cutting your chicken up into proper-sized pieces. While you’re at it, get your onions, garlic and ginger ready, too.

Heat some oil in a big enough pot. I use canola oil when I cook at home.

When the oil is hot enough, saute your onions, garlic and ginger (in that order) for a few minutes until fragrant, aka super sarap-smelling.

Next, arrange your chicken pieces in your pot. Cook, and turn, until they are brown on all sides. I don’t like eating pale, soggy chicken skin, so this step of browning is a must for me whenever I prepare chicken dishes.

Once the chicken is nicely browned, add enough water into the pot to cover all the pieces. And then, boil, boil, boil.

Some people choose to season the dish before adding water, but I like to season towards the end of the cooking process. I honestly don’t know if it makes a difference if you season before or after adding water. If anyone knows, could you please tell me?

Moving on… While waiting for the tinola to boil, wash your leafy greens and slice up your green papaya into wedges. Yesterday’s tinola had no papaya because there wasn’t any at the grocery when I went shopping. 

Once you reach a rolling boil, lower the heat and allow the chicken pieces to cook. Add the papaya wedges into the pot. When the papaya is tender, add a chicken broth cube into the pot, then season the dish with patis and pepper. 

Finally, put in your greens – typically it’s dahon ng sili but I didn’t have that either, so I used kangkong leaves – stir, then remove the pot from the heat. And you’re done cooking!

Tinola is best served with steamed rice, plus, in my opinion, fried or grilled meat or fish. Yummers.

Chicken Tinola
2016-05-28 00:48:29
Serves 4
Write a review
Save Recipe
Print
Ingredients
  1. 1 small red onion, chopped
  2. 6 cloves of garlic, sliced into slivers (I like biting into big pieces of garlic. If you don't, you can mince yours)
  3. 1 thumb of ginger, cut into strips
  4. 1kg chicken pieces (I used the breast and back portions)
  5. 6 cups water
  6. 1 small green papaya, cut into wedges
  7. 1 chicken broth cube (I used Knorr)
  8. Patis and pepper, to taste
  9. 1 pack of dahon ng sili, or 1 bundle kangkong, leaves only
Instructions
  1. Heat cooking oil in a medium-sized pot. Saute onions, garlic and ginger until fragrant.
  2. Arrange chicken pieces into the pot. Cook and turn until nicely browned on all sides.
  3. Pour enough water into the pot to cover all of the chicken pieces. Bring to a boil.
  4. Once it has reached a rolling boil, lower the heat and allow the chicken to cook.
  5. Add the papaya pieces and cook until tender.
  6. Add the chicken broth cube, and season the dish with pepper and patis.
  7. Finally, add the dahon ng sili or kangkong, and stir the pot. Remove from the heat.
Notes
  1. For a healthier pot of tinola, remove the skin from the chicken before you start cooking.
  2. This will keep for up to a month in the freezer. It's better if you freeze tinola without the veggies so they don't get soggy. You can always add the papaya and leaves when you reheat the dish anyway.
By MrsC
Adapted from Yummy
Adapted from Yummy
At Home With MrsC https://blissbysam.com/

So what do you think of my Snapchat cooking session? Should I do this again? And guys, let me know if you try this recipe at home okay? Hope you enjoy it! 🙂

Filed Under: Food & Recipes, Recipes Tagged With: Chicken Tinola, Recipe, Snapchat Cooking Session

Recipe: Calamansi Muffins

February 19, 2016 by MrsC | Patricia Cuyugan 20 Comments

Fact: I am obsessed with Real Coffee’s calamansi muffins.

I really make it a point to have some whenever I go to Boracay. I’ve also asked quite a few friends to bring boxes of the stuff home for me when they go. I knew that it was only a matter of time before I tried making these muffins myself. I finally did, and they were good.

After searching online, I decided to use Pepper.ph’s calamansi muffin recipe. I was hopeful from the moment I read this recipe, which promised to be just like my favorite island snack. The good news is that I was not disappointed.

Calamansi Muffins
Hello, beauties!


I honestly don’t think that the finished product tasted exactly like the calamansi muffins from Real Coffee. These, were lighter and softer, which to me means that they were actually better. Hooray! Notice that I speak of them in past tense? That’s because they’re all gone.

There are, however, two things I think I will change next time I make these. First, I’ll do away with the paper liners and just make them directly in a greased muffin pan. This is how they do it in Real Coffee, and I feel that this will make the bottoms of my muffins a little crustier. 

The other change I plan to make is to use brown sugar instead of white.


Calamansi Muffins
2016-02-18 23:36:43
Yields 12
Write a review
Save Recipe
Print
Ingredients
  1. 1/2 cup butter
  2. 1 cup sugar
  3. 2 pcs eggs
  4. 1 1/2 cup all purpose flour
  5. 1 tsp baking powder
  6. 1/4 tsp salt
  7. 1/4 cup milk
  8. 1/4 cup calamansi
Instructions
  1. Mix flour, baking powder and salt together in a bowl. In a separate bowl, combine milk and calamansi.
  2. In a third bowl (yes, lots of washing afterwards,) cream butter and sugar for 2-3 minutes.
  3. Add eggs one at a time to the sugar mixture, and mix well.
  4. Add the milk mixture, followed by the flour mixture. Mix until well blended, but don’t over mix.
  5. Distribute batter evenly into paper-lined muffin cups or a non-stick muffin pan.
  6. Bake in preheated 350 degrees Fahrenheit oven for 18-23 minutes.
Adapted from Pepper.ph
At Home With MrsC https://blissbysam.com/


I feel like this recipe would work well with lemons, too. When I do make a lemon version, I’ll add some zest into the batter along with the lemon juice.

I’ll probably wait a few days before I make another batch, though, coz this one disappeared far too quickly. These muffin experiments are making us all extra fat. :p

Do you bake? What are your favorite recipes? I’m always looking for something new to try.

Filed Under: Food & Recipes, Recipes Tagged With: Calamansi Muffins, Muffin Recipe, Pepper.ph, Real Coffee Boracay, Recipe Hack

  • Go to page 1
  • Go to page 2
  • Go to page 3
  • Interim pages omitted …
  • Go to page 5
  • Go to Next Page »

Welcome to my online home

Hi, I'm MrsC, a happy wife and mom, a help-less but not helpless homemaker, who is learning to live simply in this complicated world.

Copyright © 2025 · Twenty Seven Pro on Genesis Framework · WordPress