Fact: I’ve never been very good at making things look pretty. I’m simply not wired that way, which is why I became a writer instead. Trust me, I can make anything seem beautiful using the right words, but don’t make me style a flatlay or decorate an area for you. (You will see photo evidence of my design handicap throughout this post.)
This explains why, a year after our big move, our bare white walls are still bare and white. A tour of our house will also reveal that our furniture is a little bit mismatched. That’s mainly because 99% of them are hand-me-downs from different homes, but it’s also because I can’t figure out how to change things up to make them look like they belong together.
Honestly, I’m afraid to permanently install or remove anything from our house because it just might not work out. And then we’d be stuck with ugliness for a really, really long time. Lol. The struggle is real!
Obviously, it’s good for me to attend classes and workshops on styling because I need help. This is why I really made time to be at the Dessert Buffet Styling session by School of Styling Philippines at Evia Lifestyle Center. This particular workshop was perfect for me, actually, because the output is simple, manageable, and not at all permanent. In short, keri ko to.
The super talented Indy Ycasiano was our teacher that day. Here are some styling tips that learned from her at the session.
#1 Plan ahead
Indy suggests creating a sketch of what you want your table to look like before you get to work. You can also make a mock setup before the day of your event or party so that you can be sure that you have everything you need, and that everything works well together.
#2 Flat is boring.

To make things look nicer, play with levels when you arrange items on your buffet table. You can do this symmetrically, with a focal point at the center, and other items arranged similarly on either side. Symmetrical doesn’t necessarily mean identical. You can display different items on either side of the focal point, but make sure that they are similar in height so it looks balanced.
Another option is to go asymmetrical, where things are not set up in a mirrored fashion. This is much harder to pull off because you will really need to move things around until everything looks like they are in the right place. Jedi-levels of styling required here, so trust that you won’t see me working on any asymmetrically-styled dessert buffets any time soon.
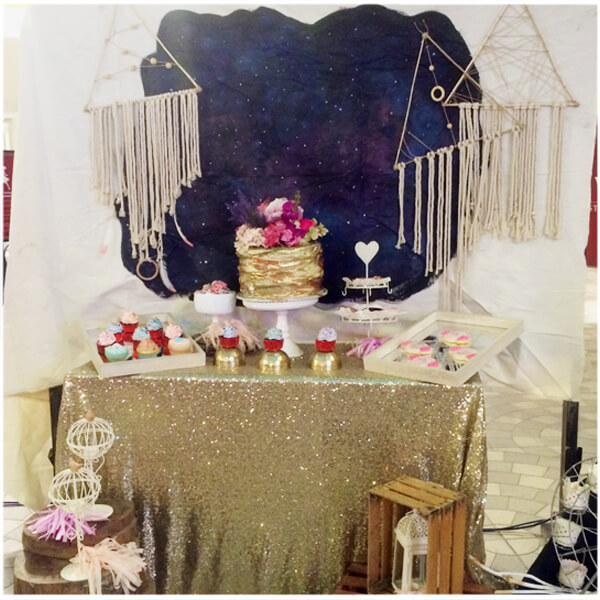
Here’s an example what a symmetrically-styled table should look like, as styled by Indy.
#3 Don’t bring out all of the desserts that you have, all at once
Just display a few of the your sweet treats on nice plates, trays or jars, then fill in any awkward spaces with decorative items. Things like food labels, objects related to your theme, flowers and party favors are great space-fillers. Don’t go overboard, though! Too many things can make for a cluttered table. And don’t forget to refill your desserts whenever needed.
#4 Add height
Playing with high and low elements can help make your table look more appealing. You can use various things to add height, such as cake stands, tiered stands, boxes, crates, and even a stack of books. The treats you choose can also give added height. Cake pops, candy canes, push-pops, and basically any treat with a vertical element can work.
#5 Embellish
Here’s where having a whole stock room full of nice props comes in handy. But if you don’t have that magical room filled with plates, bowls, linens and buntings, here are a few basic decorative add-ons that you can use.
- Fabric – A few yards of nice fabric can be used as a table cloth or runner, and can make a huge difference! See (above) how boring the blue cloth used in our party was? Learn from my mistake, guys.
- Printables – These are great because you don’t need to store them. You can just design and print things like buntings, signs and labels every time there’s a special occasion.
- Buntings and garlands – You can make these using felt balls, pompoms, ribbons, tissue, fabric, small toys, crocheted motifs (which I plan on doing for Christmas!), etc, etc, etc.
- Backdrop – Adding a backdrop to your dessert buffet helps extend the theme of your party to the table. You can use a plywood panel, canvas, or drapes for this.
#6 Always take a step back to view your table
Walk away and check your work from a distance every once in a while. You’ll get a better perspective of your buffet table this way. Assess then continue your work until you’re done and happy.
Towards the end of the workshop, attendees were split into two groups and tasked to decorate our own buffet tables. Our group created a glamping-themed buffet. I love our final output.
I had so much fun, and I really learned a lot at the workshop. Now I’m excited to start setting up pretty buffet tables at home. But first, I suppose I need to get a buffet table. Lol! Time to go shopping!
*Follow School of Styling Philippines on Instagram and Facebook to find out when their next sessions will be. Maybe I’ll even see you at one of them!